1. Go to Home and click Customer master.

2. Click the ADD button for auto-generate account no and enter customer name.
3. Check status and date for register date.

4. Save data.
How to Create Vendor:
1. Go to Vendor Menu > Vendor.

2. Press “+” to auto-generate account number.
3. Insert vendor company name, contact person and Phone number.
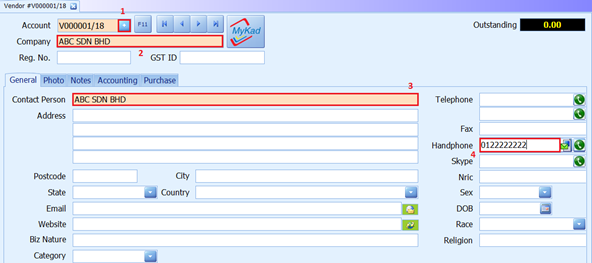
4. Save record
How to Create UOM:
1. Go to Home > Item Master.

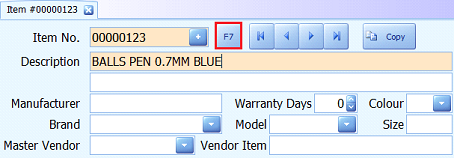
2. Press”F7” and select item you want to add UOM ( Unit of Measure ).

3. After selected, Go to UOM and click “ADD +” button.
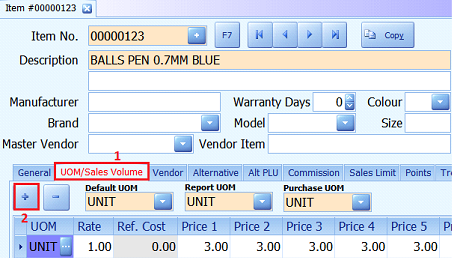
4. Click New / Edit / Del.

5. Insert UOM (eg. Pack , Dozen , Box).
![]()
7. Enter rate for quantity of a pack and price.

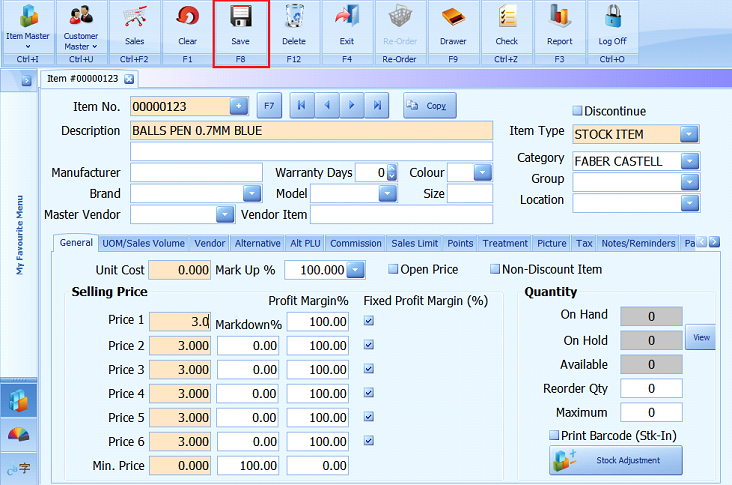
8. Save.
How to Create Sales Volume:
1. Go to Home > Item Master.

2. Press”F7” and select item.
3. Go to UOM/ Sales Volume > Sales Volume.

4. Click “+” to ADD and “-“ to remove.
![]()
5. Insert quantity and price for different customer.Press “OK” to continue.

6. Save.
How to Change Screen Colour:

1. In IRS POS SYSTEM at bottom left corner , Press “Color setting”.
2. Select your favorite color for background.
How to Change Language Settings:
1. In IRS POS SYSTEM at bottom left corner , Press “Language setting” or “My Language”.

2. Select your Language.

How to View Report:
1. Go to Home > Report.

2. Select your report option.

3. Select date range and preview report.
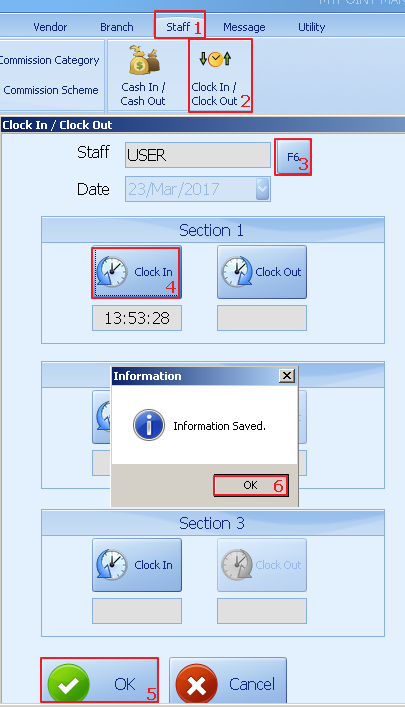
How to clock in & clock out:
Method 1:
1. Select staff.
2. Select Clock in / Clock out.
3. Click F6 to select which staff.
4. Click clock in to update time.
5. Click ok to confirm.
6. Click ok.
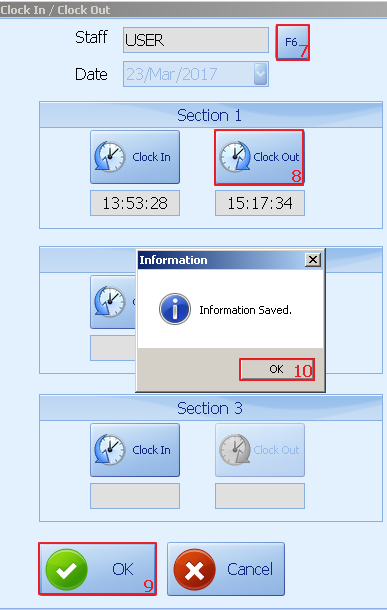
7. Click F6 to select which staff.
8. Click clock out to update time.
9. Click ok to confirm.
10. Click ok.
Method 2:
1. On login click click on the clock logo.
2. Enter the user ID & Password.
3. Click ok to login.

4. Click clock in to update time.
5. Click ok to confirm.
6. Click ok.
.
7. Click clock out to update time.
8. Click ok to confirm.
9. Click ok.

How to check clock in & out report:
1. Click on report.
2. Select staff column.
3. Select clock in/out listing.
4. Set the date range or salesperson.
5. Choose which type of format.
6. Click preview.
How to Set Treatment Commission:
1. Select item master.
2. Select item.
3. Select treatment tab.
4. Enable treatment service.
5. Enter the no of treatment for this item.
6. Choose the treatment commission option.
7. Enter the amount.
8. Click save to update system.

9. Select customer account.
10. Make payment as usual.

11. Select customer.
12. Under transaction select treatment.
13. Select the customer account.
14. Click on edit.

15. Select the salesperson.
16. Click ok.
17. Click save to update system.

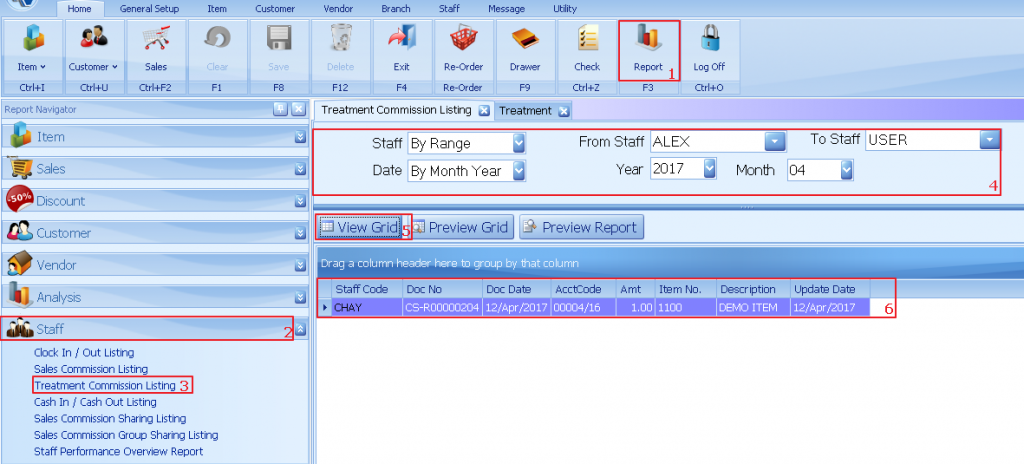
How to check treatment commission:
1. Select report.
2. Enlarge staff column.
3. Select commission listing.
4. Change the filter option(if needed).
5. Click view grid.
6. The grid report will show here.
7. Click preview report.
8. Select report format.
9. Click to preview.
How to Set Commission by Fixed Rate:
Set category for staff:
1. Select staff.
2. Select salesperson.
3. Enter the staff code.
4. Shows stuff name.
5. Select the staff category.
6. Tick salesperson column.
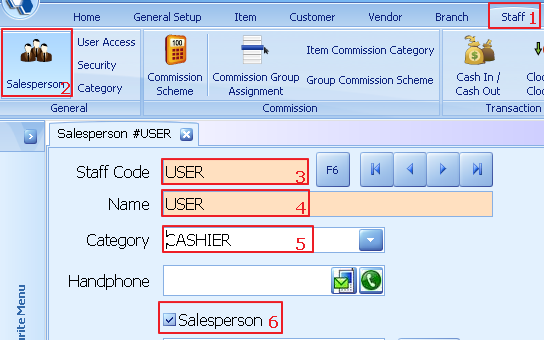
7. Click save.

Set commission for item:
1. Select item master.
2. Select which item entitled for commission.
3. System will show that item name.
4. Select commission column.
5. Select fixed rate.
6. Click add(+).

7. Select staff category.
8. Select type of commission entitled.
9. Select ok to confirm.

10. Click save to update system.

11. Select salesperson on sales screen.
12. Select item that entitled for commission.
13. Make payment as usual.

1. Select report.
2. Enlarge staff column.
3. Select report sales commission sharing listing.
4. Select staff.
5. Click on view grid.
6. All the commission data will show here.

8. Select which type of report format to preview.
9. Click to preview report.
How to Import Stock Quantity by Excel:
1. Enter IM_ITEMNO & QUANTITY as column header.
2. Enter theactual quantity follow by itemno.

4. Change to actual quantity.
5. Select import-excel on more option.

7. Click open.

8. After new balance quantity is update.
9. Click save.
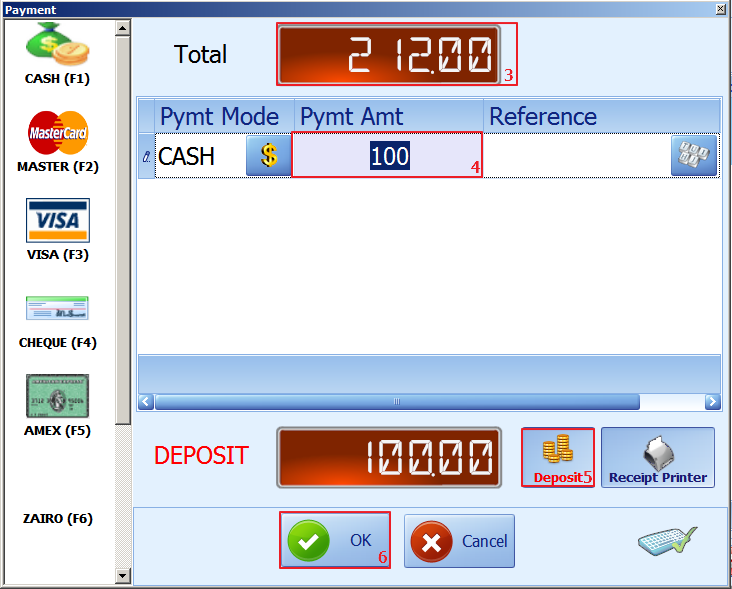
How to Perform a Deposit:
1. Select item.
2. Click on payment.
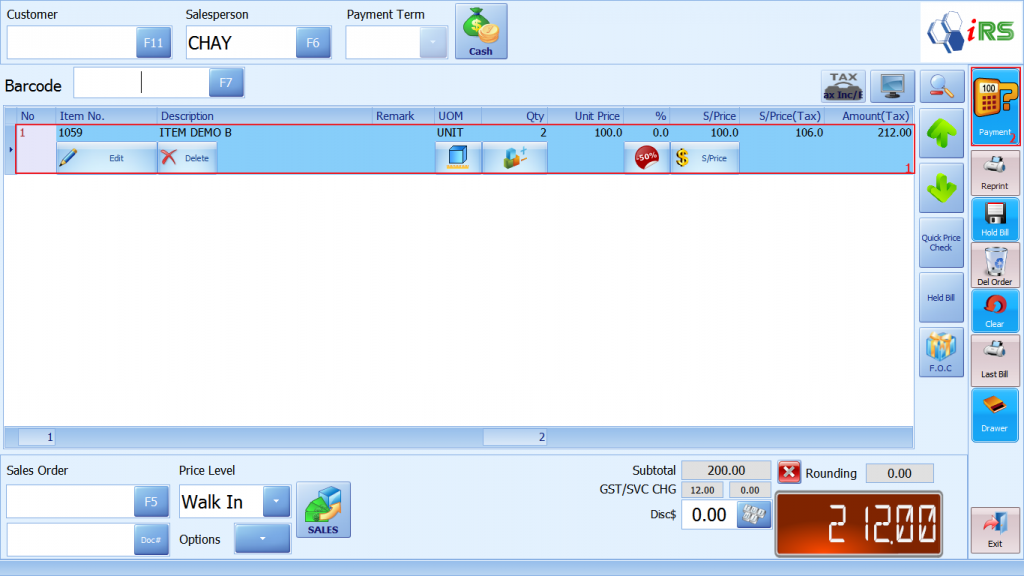
3. Total amount to pay.
4. Enter the amount collected.
5. Click deposit.
6. Click ok to confirm.
Example:

1. Click on the F5 button.
2. Lookup for the sales order.

3. Sales order information will show on screen.
4. Click payment.
5. Total amount of payment.
6. Click ok to confirm payment.
How to Perform Credit Sales:
1. Select the customer account.
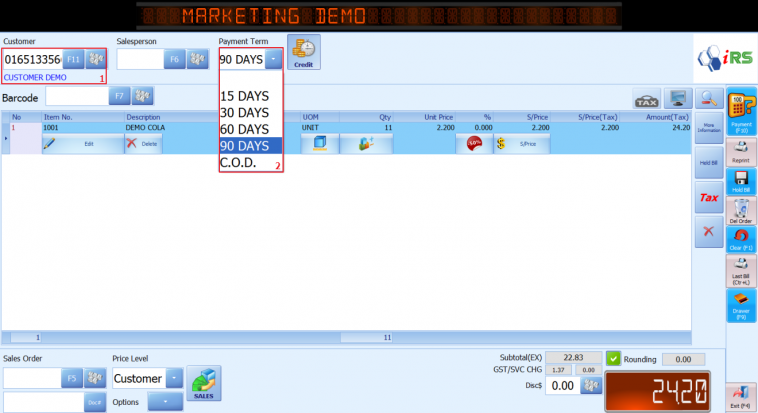
2. Under payment term please select credit and choose the days.

3. Click yes to generate invoice and print out receipt.
How to Perform Credit Sales Return:
1. Select customer.
2. Select goods return.

3. Enter the doc no /select inoive from the list by pressing F11.
4. Select the invoice.
5. Click on ok.

7. Select Return All.
8. Enter the reason.
9. Select ok to confirm.
10. Click on save to proceed.

11. Click yes if wish to issue credit note.
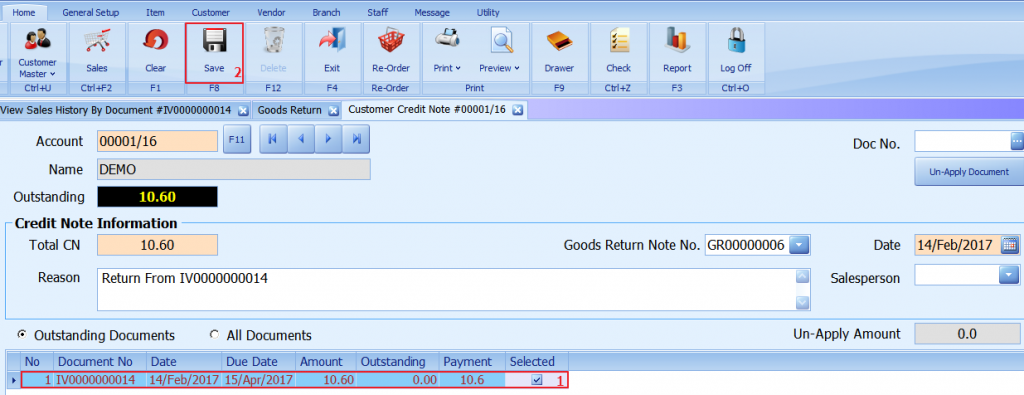
12. Select which document to perform return.
13. Click save.

14. Click yes to save credit note.
How to Hold Bill:
1. Select item on sales screen.
2. Click on hold bill.
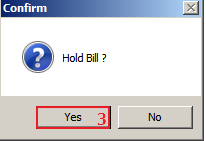
 4. 4. The sales will reset and proceed to next order.
5. After done select sales order.
6. Search for previous hold bill.
7. Click ok.
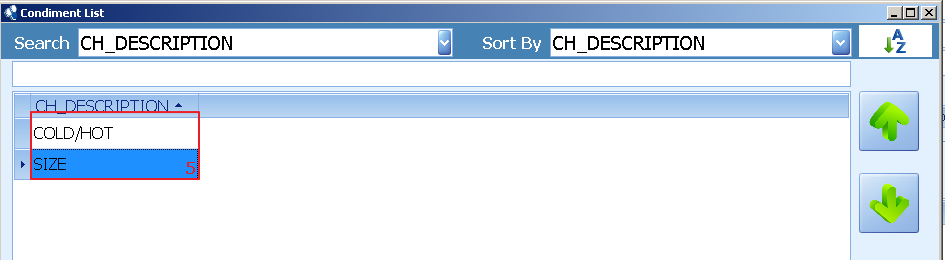
How to Set Condiment:
1. Click on Item.
2. Click on Condiment.
3. Click on Condiment Category.
4. Click to Add.
5. Enter the description.
6. Click OK.
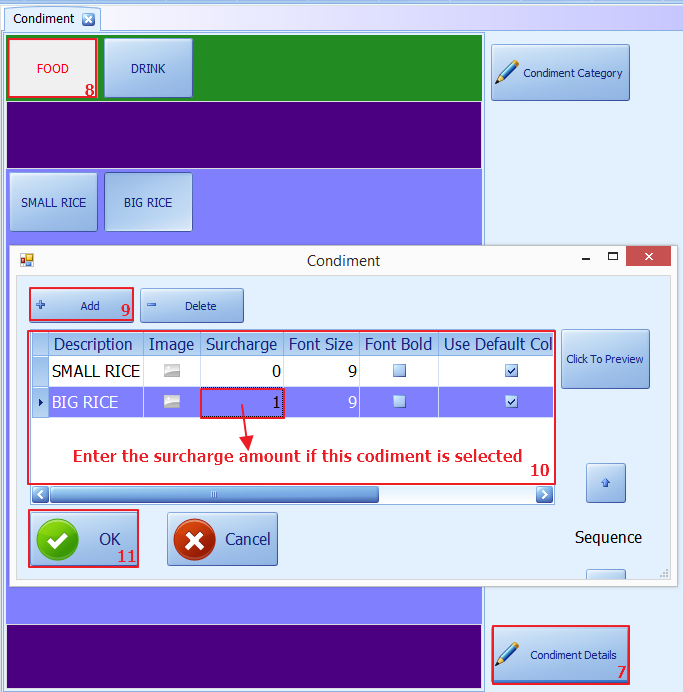
7. Click Condiment Details.
8.Choose and click on condiment category.
9. Click Add.
10. Enter the description.
11.Click on OK.

12. Click on Save to update.
How to Set Condiment for Item:
1. Select item master.
2. Select which item no.
3. Click on FnB.
4. Select + to add condiment category.

7. Tick prompt to select condiment if needed when item is selected.

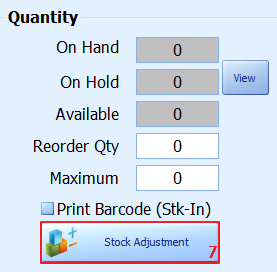
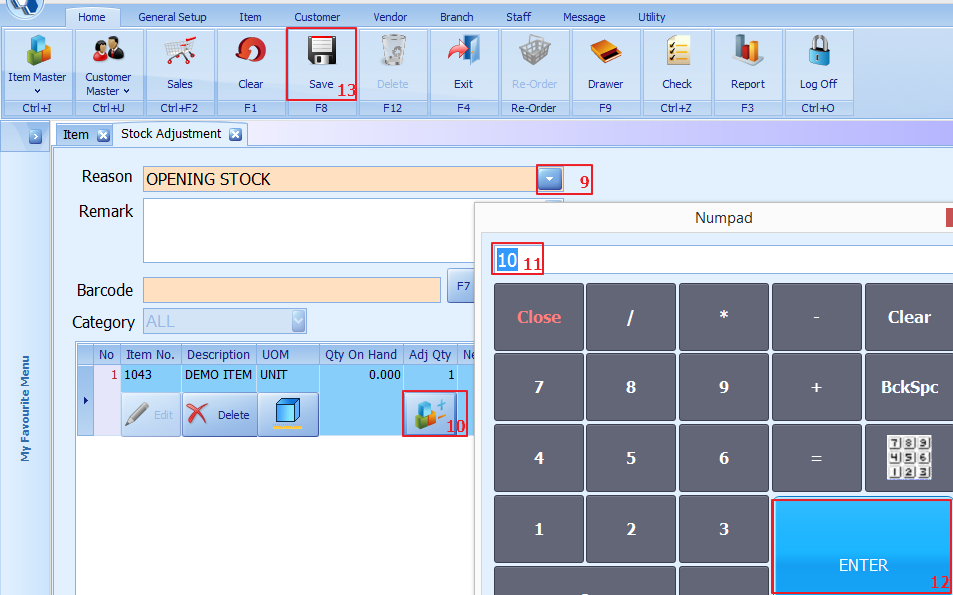
How to do Stock Adjustment:
Adjustment option by IN/OUT:

1. Enter / select reason.
2. Choose from reason list.
3. Select which item.
4. Enter the adjustment quantity.

5. After confirm the quantity click save.
6. Click yes to confirm stock adjustment.

7. Click yes if you wish to print out stock adjustment document.
Adjustment option by actual quantity:

1. Select adjustment options by actual quantity.
2. Select reason.
3. Choose from reason list.
4. Enter the actual quantity on hand.
5. Click save.


How to lookup for previous stock adjustment document:

2. Select print document from more option.
3. Click preview.
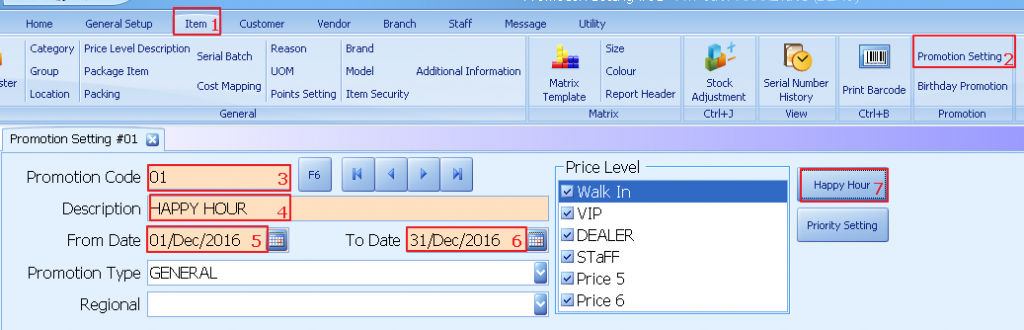
How to Set Promotions Settings:
Happy hour:
1. Select item.
2. Select promotions setting.
3. Enter promotions code.
4. Enter description.
5. Enter promotions start date.
6. Enter promotions end date.
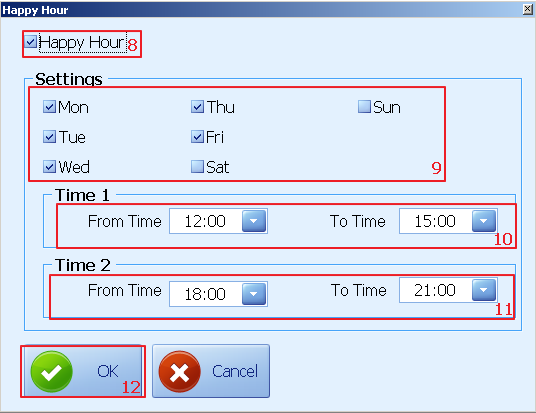
7. Select happy hour.
9. Setting data.
10. Set happy hour for time 1.
11. Set happy hour for time 2.
12. Click ok.
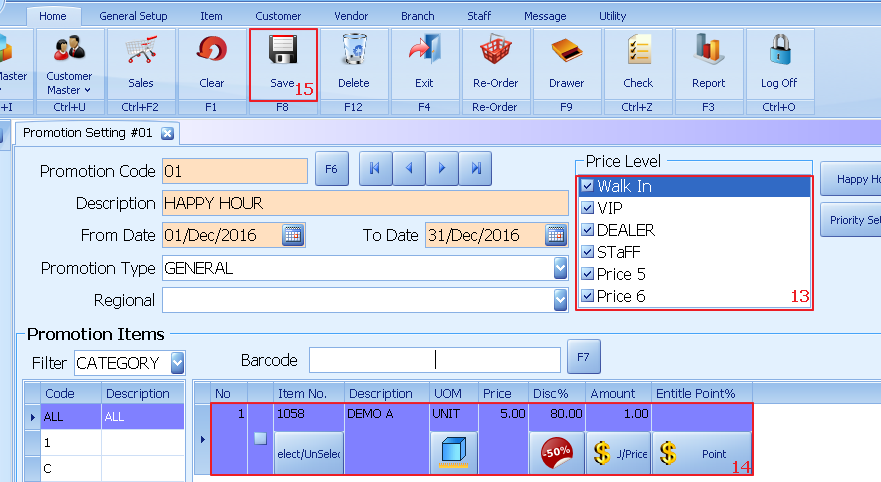
13. Select which price level entitled for the happy hour.
14. Select which item & enter the amount during happy hour.
15. Click save.
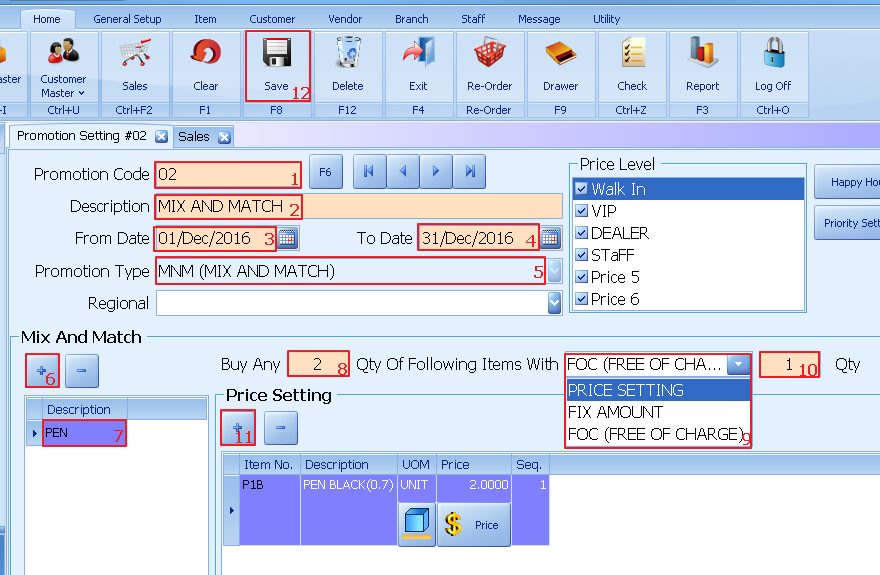
MIX AND MATCH
1. Enter promotions code.
2. Enter description.
3. Enter promotions start date.
4. Enter promotions end date.
5. Promotion type select mnm.
6. Click +.
7. Enter description.
8. Enter the quantity.
9. Price setting for the item.
10. Enter the qunatity entitled promotions.
11. Click + to select which item entitked for prmotions.
12. Click to save.
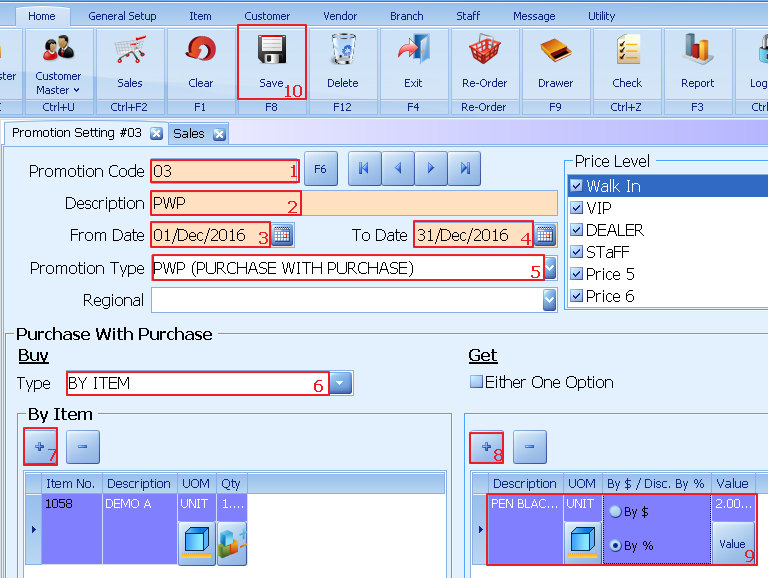
PURCHASE WITH PURCHASE(By item)
1. Enter promotions code.
2. Enter description.
3. Enter promotions start date.
4. Enter promotions end date.
5. Select prmotions type as pwp.
6. Select type by item.
7. Click + to select which item to be purchased.
8. Click + to select which item to be discount.
9. Set the item discount by $ / %.
10. Click save to update.
PURCHASE WITH PURCHASE(By Subtotal Amount)
1. Enter promotions code.
2. Enter description.
3. Enter promotions start date.
4. Enter promotions end date.
5. Select prmotions type as pwp.
6. Select type by sub total amount.
7. Enter the amount.
8. Click + to select which item to be discount.
9. Set the item discount by $/%.
10. Click save to update.
How to Set Point Setting:
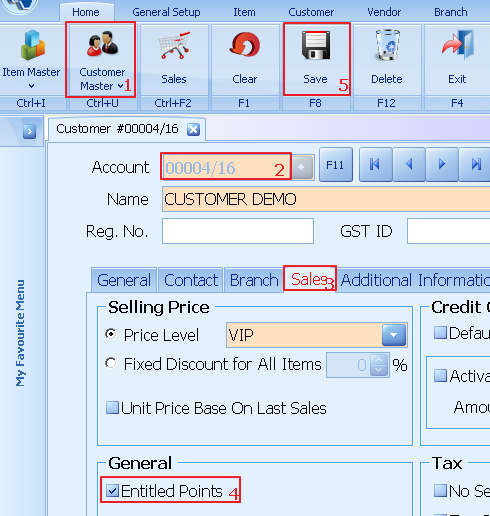
How to entitle point for customer:
1. Select customer master.
2. Select account.
3. Click on sales.
4. Tick entitled point.
5. Click save.
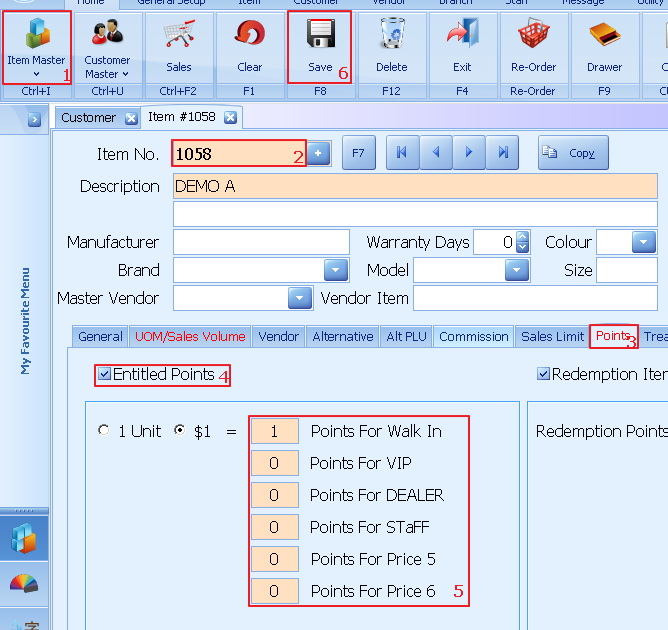
How to entitled point for item:
1. Select item master.
2. Select which item no.
3. Click on points.
4. Tick entitled points.
5. Enter the amount for type of price level.
6. Click save to update.


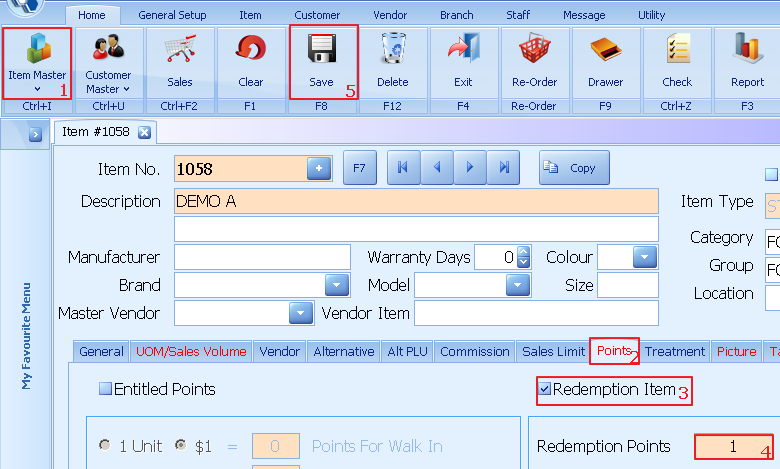
How to set as redeem item:
1. Select item master.
2. Click on point.
3. Tick redemption item.
4. Enter point value.
5. Click save.
How to redeem an item:
1. Select customer.
2. Select transaction.
3. Select redemption.
4. Enter customer account.
5. Select which item to redeem.
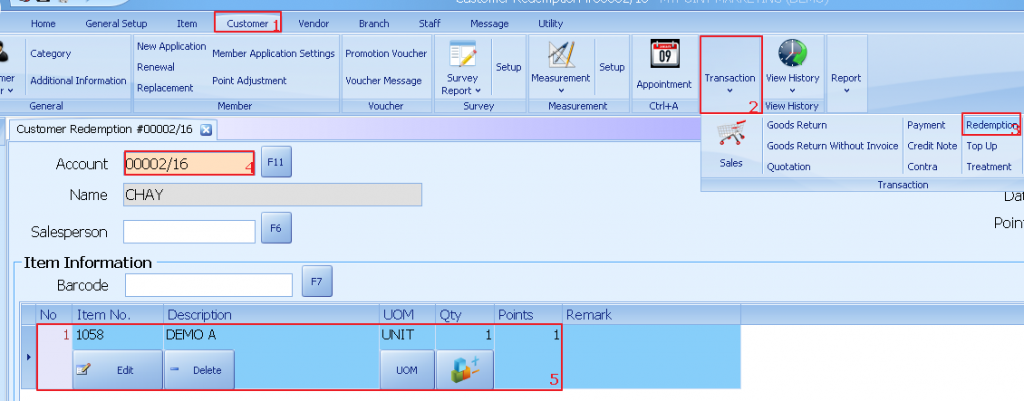
6. Click save.
7. Click yes to confirm.
How to Change Price Level Description:

1. Select Item.
2. Click On Price Level Description.
3. Update the new description
4. Save.
How to Set Email Settings for Sending Daily Check Report:
1. Click on check.
2. Click on preview.
3. Click account to setting.
4. Enter email address.
5. Enter name.
6. Enter host from mail setting.
7. Enter port from mail setting.
8. Enter user name as per email.
9. Enter password as per email.

10. Setting for receiver email address.
11. Enter receiver email address.
12. Enter subject for email.
13. Enter message to email if needed.
14. Select attachment format.
15. Once click system will auto send email.
Item Types (Package Item,Weight Item, Expiry Item, Stock Item, Service Item, Serialized Item, Matrix Item):
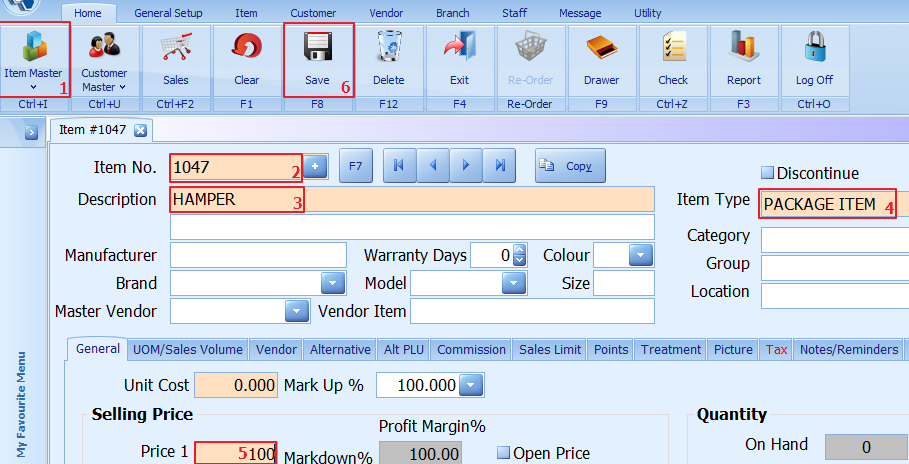
Package item
1. Click on item master.
2. Enter/scan item no or press + for auto generate.
3. Add description for the item.
4. Choose the item type(package item).
5. Enter the item selling price.
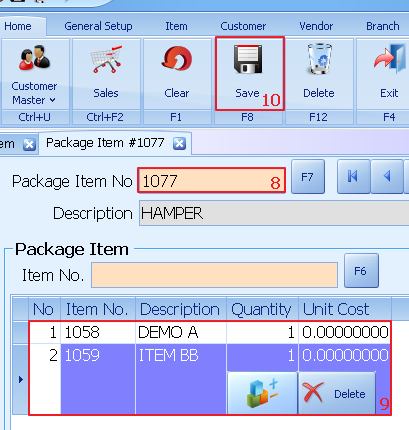
6. Click to save.
7. Click on stock adjustment

8. Select on which package item no.
9. Enter the item no.
10. Click on save to proceed.
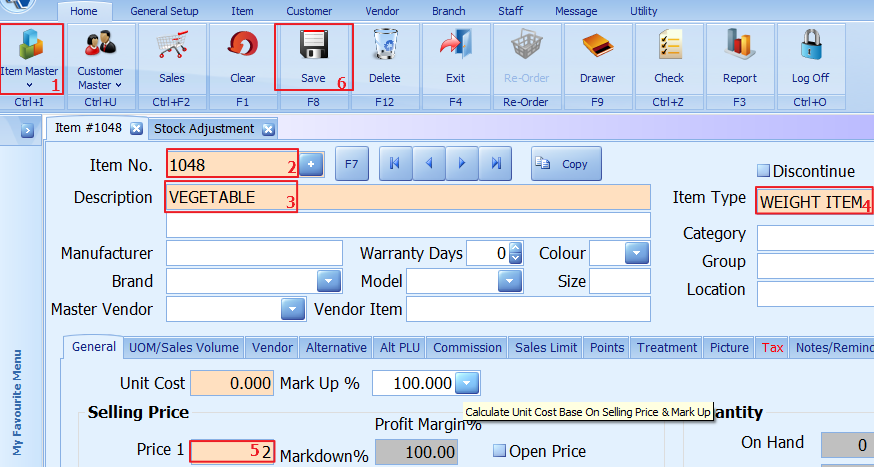
Weight Item
1. Click on item master
2. Enter/scan item no or press + for auto generate
3. Add description for the item
4. Choose the item type(weight item)
5. Enter the item selling price
6. Click to save
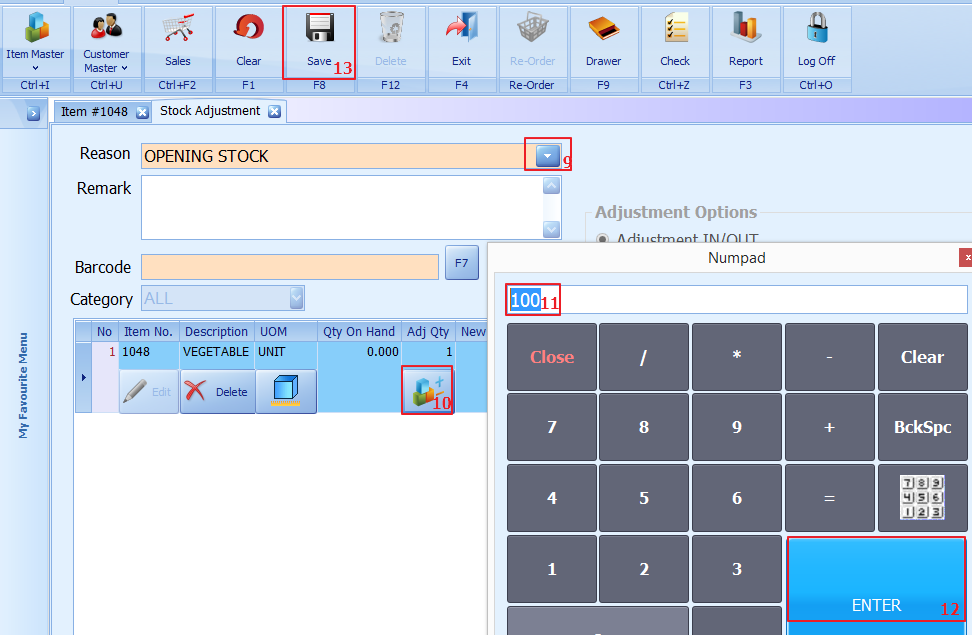
9. Select reason.
10. Click on adjustment quantity icon.
11. Enter the quantity.
12. Click enter.
13. Click on save.
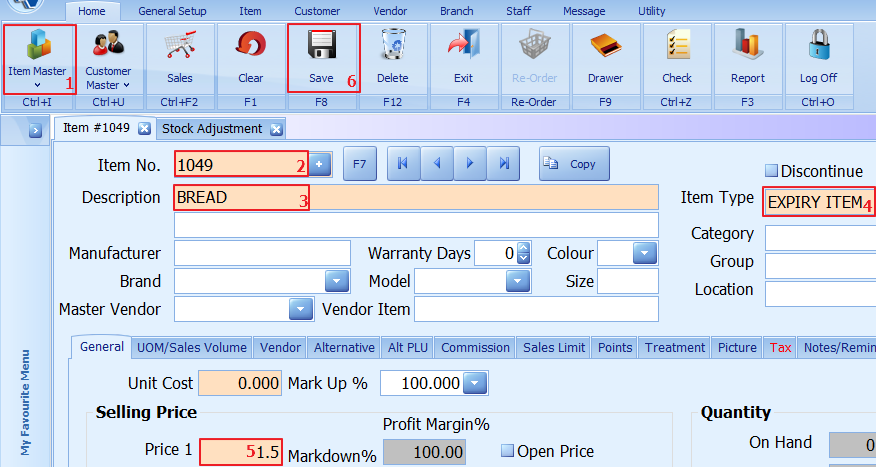
Expiry Item
1. Click on item master.
2. Enter/scan item no or press + for auto generate.
3. Add description for the item.
4. Choose the item type(expiry item).
5. Enter the item selling price.
6. Click to save.
7. Click on stock adjustment.
9 Enter the expiry date.
10. Enter the adjustment quantity.
11. Click on ok.
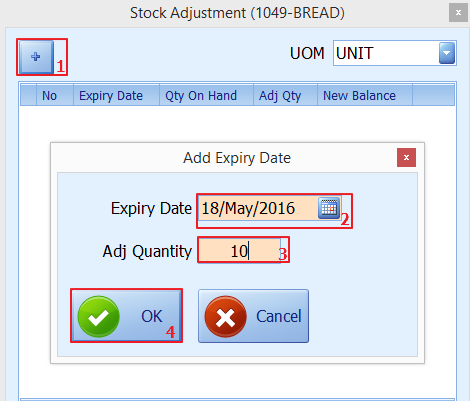
5. The adjustment quantity will show.
6. Click on save to update.
Stock Item
Item that needs to be kept track in and out.
1. Click on item master.
2. Enter/scan item no or press + for auto generate.
3. Add description for the item.
4. Choose the item type(stock item).
5. Enter the item selling price.
6. Click to save.

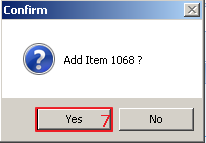
7.Click YES to confirm add item.
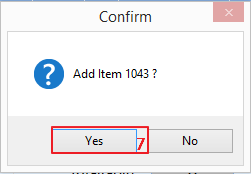
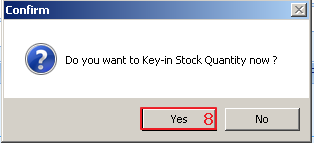
8. Click YES / NO to adjust stock later.
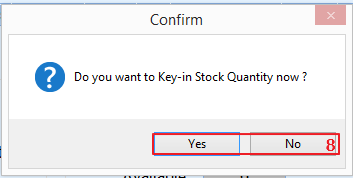
9. Select reason.
10. Click on adjustment quantity icon.
11. Enter the quantity.
12. Click enter.
13. Click on save.
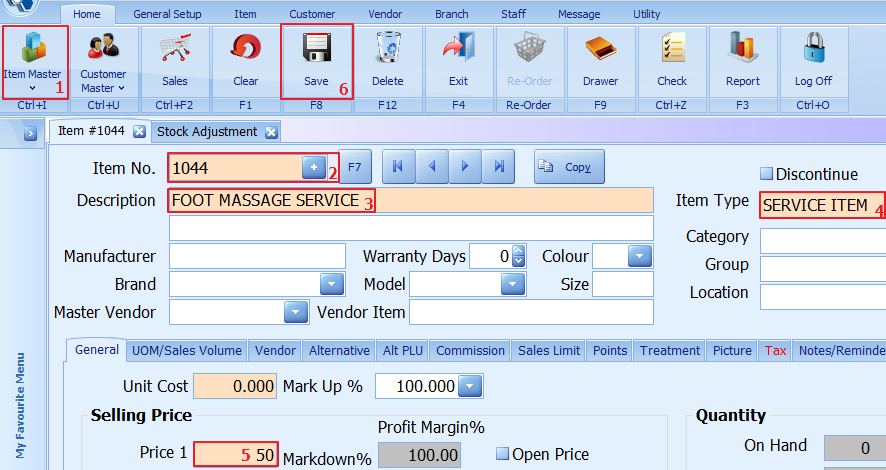
Service Item
Known as a non-stock item (without stock qty).
1. Click on item master.
2. Enter/scan item no or press + for auto generate.
3. Add description for the item.
4. Choose the item type(service item).
5. Enter the item selling price.
6. Click to save.
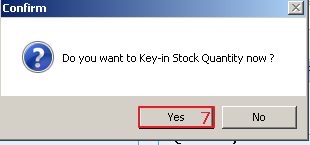
Serialized Item
Product with serial number/ IMEI.
1. Click on item master.
2. Enter/scan item no or press + for auto generate.
3. Add description for the item.
4. Choose the item type(serialized item).
5. Enter the item selling price.
6. Click to save.
7. Click on yes to adjust stock quantity.
8. Manually enter the s/n or click on generate s/n.
9. Enter the s/n format.
10. Enter the amount.
11. Click to auto generate s/n.
12.Click ok.
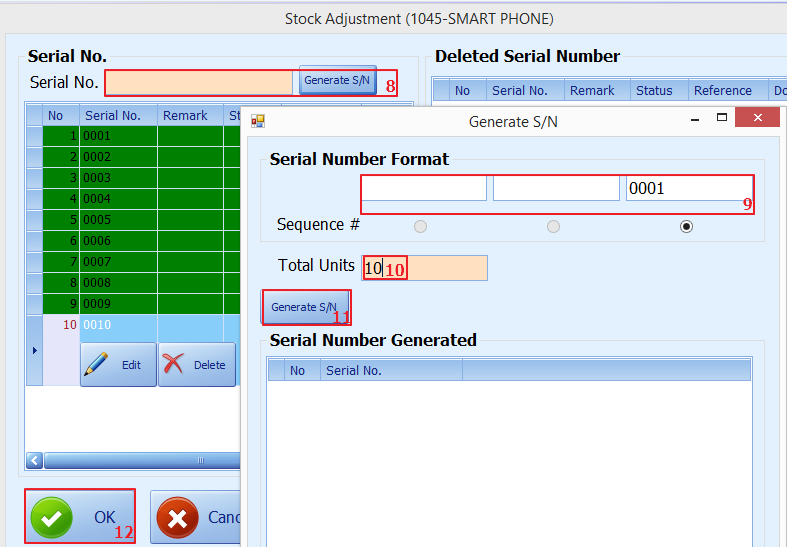
13. Select reason.
14. System will show the quantity.
15.Click on save.
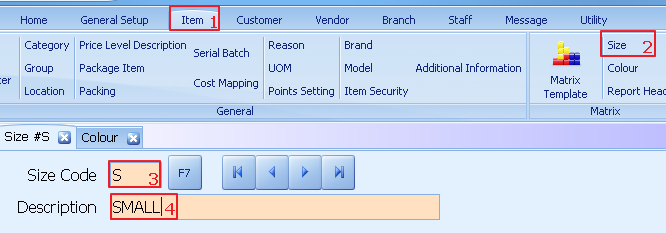
1. Select item.
2. Select size.
3. Enter size code(S,M,L & XL).
4. Enter description.
5. Save.
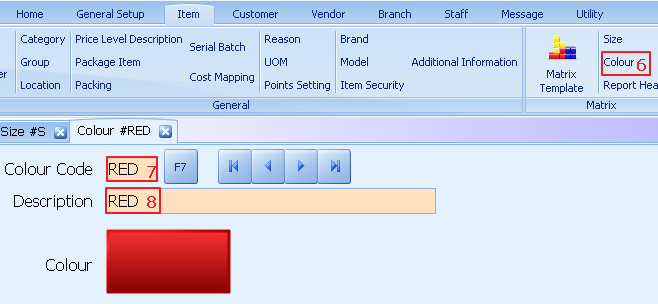
6. Enter colour code (red,org,blk & grn).
7. Enter description.
8. Save.
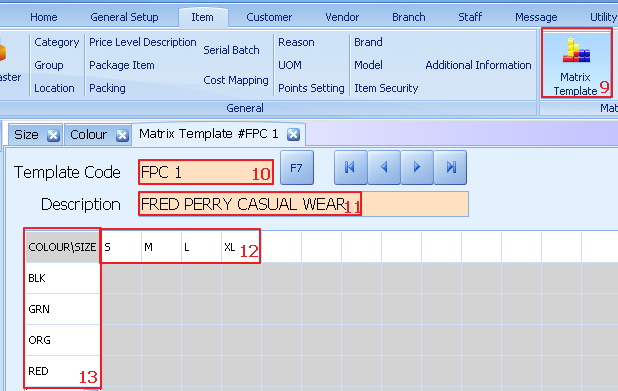
9. Select matrix template.
10. Enter template code.
11. Enter description.
12. Enter size.
13. Enter colour.
14. Save.
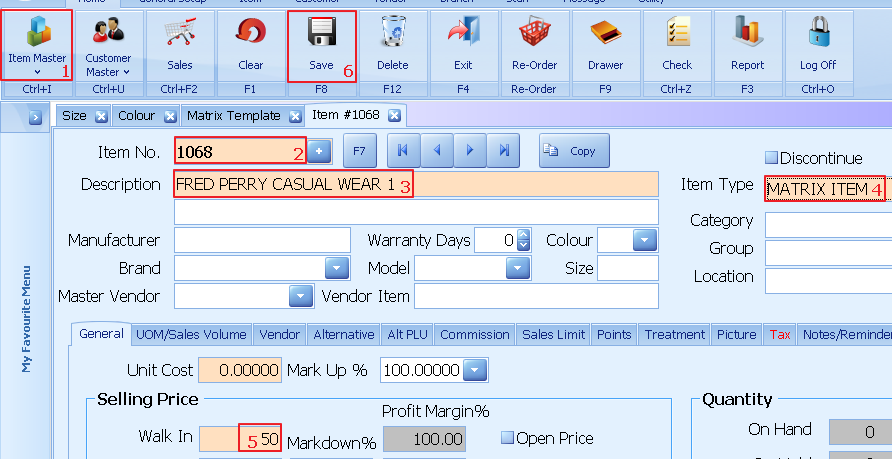
1. Click on item master.
2. Enter/scan item no or press + for auto generate.
3. Add description for the item.
4. Choose the item type(matrix item).
5. Enter the item selling price.
6. Click to save.
7. Click yes to confirm add item.
8. Click yes to confirm adjust quantity.
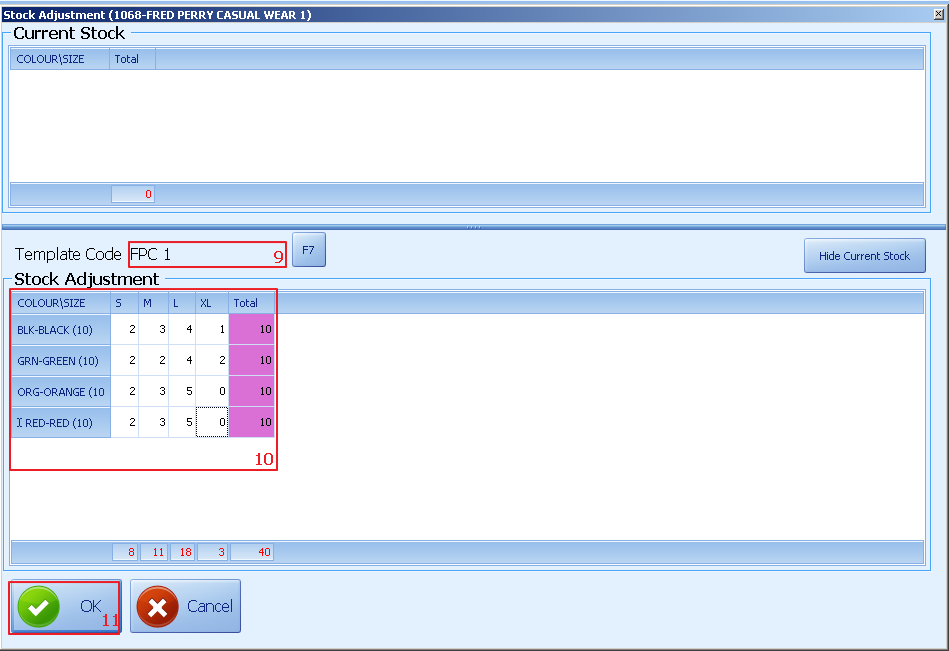
9. Select template code.
10. Enter the stock based on colour/size.
11. Click OK to proceed.
12. Enter reason.
13. Click save.